Claude Code Hooks: The Power-User Guide to Automating Your Agent
Claude Code hooks run your commands automatically at lifecycle events — validate, lint, block, or log without being in the loop. The events, config, five recipes, the exit-code gotcha, and how to run Claude Code with no setup.
Claude Code hooks are user-defined commands that run automatically at specific points in Claude Code's lifecycle — before a tool call, after an edit, when a session starts, when Claude finishes a turn — so you can validate, format, log, or block actions without being in the loop every time. They're the difference between an AI coding agent that suggests and one that follows your rules deterministically. This guide explains what hooks are, every event they can fire on, how to configure them, five practical recipes you can copy, the exit-code gotcha that trips everyone up, and how to use Claude Code's full power without any local setup.
What Are Claude Code Hooks?
A hook is a handler — a shell command, an HTTP endpoint, an MCP tool call, or even a model prompt — that Claude Code runs automatically when a particular event occurs. The handler receives structured input (on stdin for command hooks, or as a POST body for HTTP hooks), can inspect what's happening, take an action, and optionally return a decision that changes what Claude does next.
That last part is what makes hooks powerful rather than just convenient. A hook isn't only a notification — it can block a tool call, rewrite a tool's input or output, inject extra context, or stop Claude entirely. In other words, hooks turn Claude Code from a smart assistant into a programmable one that enforces your team's guardrails deterministically, not just when the model happens to remember them.
When Hooks Fire: The Lifecycle
Hooks attach to events, and Claude Code exposes a lot of them. They group by cadence: some fire once per session, some once per turn, and some on every tool call.
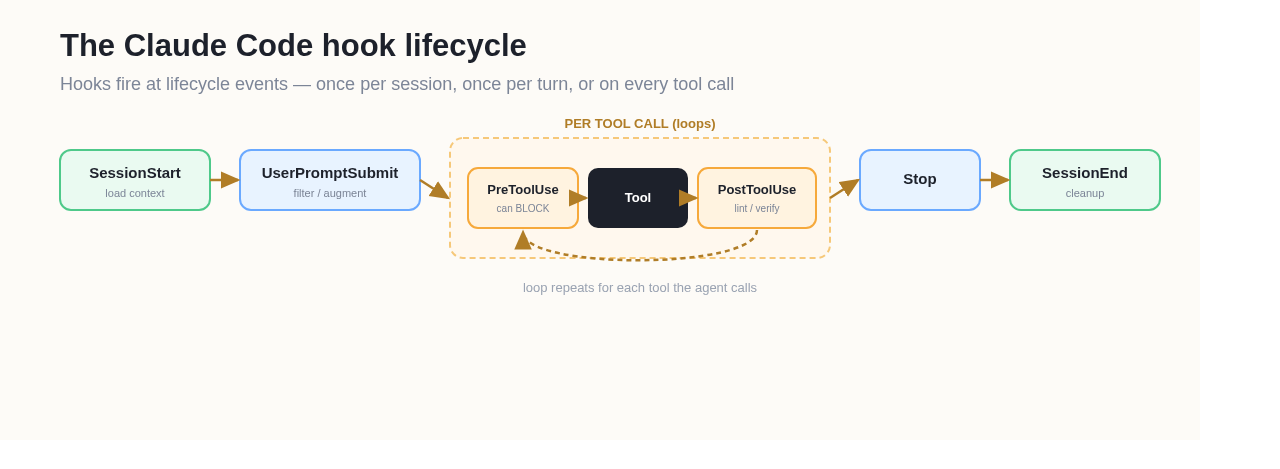 Where hooks fire across a Claude Code session — from SessionStart to SessionEnd.
The events you'll use most:
SessionStart/SessionEnd— once when a session begins or ends. Great for loading context (open issues, branch info, environment variables) or cleanup.UserPromptSubmit— fires when you submit a prompt, before Claude processes it. You can filter or augment the prompt.PreToolUse— before any tool call. This is where you block dangerous actions.PostToolUse(andPostToolUseFailure) — after a tool call succeeds (or fails). The place for linting, formatting, and verification.Stop/StopFailure— when Claude finishes responding, or the turn ends on an error.Notification— when Claude Code emits a notification (useful for desktop alerts).
Beyond those, Claude Code also fires hooks for subagents (SubagentStart/SubagentStop), tasks (TaskCreated/TaskCompleted), context compaction (PreCompact/PostCompact), working-directory changes (CwdChanged), file changes on disk (FileChanged), instruction loading (InstructionsLoaded), and more. The breadth is the point: almost any moment in the agent's loop is a place you can attach policy.
The Five Types of Hook Handlers
A hook event can trigger five different kinds of handler, which is what makes the system flexible:
command— runs a shell command; reads input on stdin, signals decisions via exit code and stdout.http— POSTs the event JSON to a URL and reads the JSON response.mcp_tool— calls a tool on a connected MCP server.prompt— a single-turn model evaluation that returns a yes/no JSON decision (useful for fuzzy checks).agent— spawns a subagent (experimental).
For most teams, command hooks do 90% of the work — a shell script is enough to lint, block, or log.
How to Configure a Hook
Hooks live in settings files (the official Claude Code hooks documentation is the canonical reference), and where you put them controls their scope:
| Location | Scope |
|---|---|
~/.claude/settings.json | All your projects |
.claude/settings.json | One project (committable — shareable with your team) |
.claude/settings.local.json | One project, local only (gitignored) |
| Managed policy settings | Organization-wide (admin) |
The structure nests three levels: pick an event, add a matcher group, then define the handlers. Matchers decide which tool calls a hook applies to — "*" (or omitting it) matches everything, a simple Edit|Write matches those exact tools, and anything more complex is treated as a regular expression. (MCP tools match the pattern mcp__<server>__<tool>.)
Here's a PostToolUse hook that runs a lint check after every edit:
{
  "hooks": {
    "PostToolUse": [
      {
        "matcher": "Edit|Write",
        "hooks": [{ "type": "command", "command": "/path/to/lint-check.sh" }]
      }
    ]
  }
}
Five Practical Hook Recipes
These are the patterns teams reach for first:
- Lint or format after every edit. A
PostToolUsehook matched toEdit|Writethat runs your formatter or linter, so the agent's code always meets your style rules. - Block destructive commands. A
PreToolUsehook matched toBashthat inspects the command and blocksrm -rfand friends before they ever run. - Desktop notifications. A
Notificationhook that pings you when Claude needs attention or finishes a long task. - Audit logging. A
PostToolUse(or MCP-targeted) hook that logs every tool call for compliance — what ran, when, and with what arguments. - Load project context at startup. A
SessionStarthook that pulls in open issues, the current branch, or environment variables so the agent begins each session already oriented.
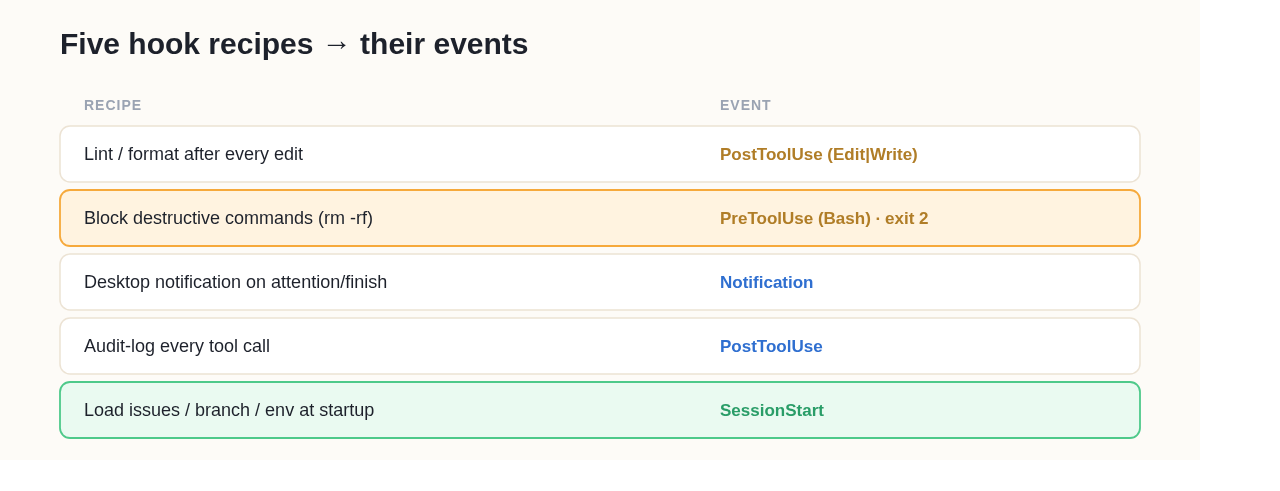 Five common hook recipes and the events they attach to.
The Exit-Code Gotcha
This is the detail that trips everyone up, so internalize it: for command hooks, only exit code 2 blocks. Exit 0 means success (and stdout is parsed for any JSON decision). Exit 2 is a blocking error — its stderr is fed back to Claude. Any other code, including exit 1, is a non-blocking error — Claude carries on.
So if you write a "block this" hook and exit 1, it will not block — the action proceeds. To actually enforce a policy from a command hook, exit 2. (Command hooks can also return richer control as JSON on stdout — permissionDecision: "deny" for PreToolUse, updatedInput to rewrite arguments, additionalContext to inject information, and continue: false to stop Claude entirely.)
A Worked Example: Blocking rm -rf
Let's build the destructive-command guard end to end, because it shows every moving part. First, the config — a PreToolUse hook matched to Bash:
{ "hooks": { "PreToolUse": [{ "matcher": "Bash",
  "hooks": [{ "type": "command", "command": "${CLAUDE_PROJECT_DIR}/.claude/hooks/guard.sh" }] }] } }
Then the script, guard.sh. Claude Code sends the event as JSON on stdin, including the tool's input; the script reads it, checks the command, and decides:
#!/usr/bin/env bash
input=$(cat)
cmd=$(echo "$input" | jq -r '.tool_input.command // ""')
if echo "$cmd" | grep -Eq 'rm +-rf|mkfs'; then
  echo "Blocked: destructive command refused by policy." >&2
  exit 2     # exit 2 blocks — exit 1 would NOT
fi
exit 0
The decisive line is exit 2. Return 0 and the command runs; return 1 and — counterintuitively — it still runs as a non-blocking error; only exit 2 blocks and feeds your stderr message back to Claude so it understands why. Make the script executable, commit it under .claude/hooks/, and every Bash call now passes through your guard — for your whole team, since the project settings.json is shareable. For a hard guarantee rather than a best-effort net, pair it with Claude Code's permission rules; as a deterministic, version-controlled safety net, this hook already does the job.
When Hooks Aren't the Answer
Hooks are for deterministic, repeatable policy — "always lint after an edit," "never run rm -rf." They're the wrong tool for things that need judgment (use the model or a prompt hook for fuzzy calls) and for hard security guarantees (use the permission system, since command-hook if filters fail open). Don't over-hook, either: every command hook runs a process with a timeout, and a thicket of slow hooks adds latency to every tool call. Keep them fast, few, and focused on the rules that actually matter.
Safety Notes Worth Knowing
A few realities the docs are explicit about:
- The
iffilter fails open. If you use theiffield to scope a hook to a permission rule and the command can't be parsed, the hook runs anyway. For hard allow/deny enforcement, use Claude Code's permission system, not hooks. - Hooks run without a controlling terminal — they can't prompt on
/dev/tty. UsesystemMessageor the restrictedterminalSequenceoutput for user-facing messages. - Stdout must be clean. Only the JSON decision object should be on stdout; stray shell-profile output can break parsing.
- Treat injected context carefully.
additionalContextshould be written as factual statements, not imperative commands, to play nicely with prompt-injection defenses.
Hooks Are Harness Engineering in Miniature
Step back and hooks are a concrete example of a bigger idea: the model isn't the whole agent — the system around it is. Hooks are part of the harness that makes a coding agent reliable, sitting alongside the loop, tools, memory, and sandbox. (We go deep on that mental model in harness engineering.) When you write a PreToolUse block or a PostToolUse linter, you're doing harness engineering — shaping the agent's behavior deterministically rather than hoping the model behaves.
That framing also tells you when hooks are worth the effort: any rule you'd otherwise have to remind the agent of every time is a candidate for a hook.
Using Claude Code's Full Power Without Local Setup
Hooks live in the Claude Code CLI, which means you need it installed and configured to use them — a wall for anyone not set up in a terminal, and impossible for non-developer teammates. If you want Claude Code's agent capabilities without managing a local install, you can run Claude Code in your browser on Happycapy: it runs Claude Code in a managed cloud sandbox where the harness — the loop, tools, memory, and isolation that hooks plug into — is already wired up for you. You describe a task and watch the agent work on a visual desktop, no terminal required.
Think of it this way: hooks let advanced users hand-tune Claude Code's harness; Happycapy gives everyone a managed harness out of the box. If you've wanted to put Claude Code to work but the CLI setup stopped you, start free at happycapy.ai and run a real task in your browser today.
Frequently Asked Questions
Q: What are Claude Code hooks?
They're user-defined handlers — shell commands, HTTP endpoints, MCP tool calls, or model prompts — that Claude Code runs automatically at lifecycle events like before a tool call (PreToolUse), after an edit (PostToolUse), or at session start. They can validate, format, log, block, or rewrite actions.
Q: What hook events does Claude Code support?
Many — including SessionStart/SessionEnd, UserPromptSubmit, PreToolUse, PostToolUse (and PostToolUseFailure), Stop/StopFailure, Notification, subagent and task events, and compaction events. They fire once per session, once per turn, or on every tool call.
Q: How do I make a hook block a tool call?
For command hooks, exit with code 2 — only exit 2 blocks (exit 1 does not). For PreToolUse, you can also return JSON with permissionDecision: "deny". For hard enforcement, prefer Claude Code's permission system, since the hook if filter fails open.
Q: Where do I configure Claude Code hooks?
In settings files: ~/.claude/settings.json (all projects), .claude/settings.json (one project, shareable), or .claude/settings.local.json (local only). You pick an event, add a matcher, and define handlers.
Q: Can I use Claude Code hooks without installing the CLI?
Hooks themselves require the Claude Code CLI. If your goal is to use Claude Code without local setup, run it in a managed browser sandbox like Happycapy, which provides the agent and its harness ready to go — ideal when you don't want to install and configure the CLI yourself.
Q: What's a good first hook to add?
A PostToolUse linter matched to Edit|Write — it runs your formatter after every code change, so the agent's output always meets your style rules. It's low-risk and immediately useful.